


How To Electrolytically Etch in Copper, Brass, Steel, Nickel Silver or Silver
Introduction
Electrolytic etching uses electricity, and a solution usually based on the type of metal you want to etch. You attach the positive side of the current to your piece, and the negative side to a piece of the same metal. When the electricity flows, it causes metal from your piece to flow through the solution toward the metal on the negative side. The more metal in the solution, the faster your piece will etch.
I originally learned the process of electrolytic etching back in early 2009 in a class taught by David S. Dowling, who does some amazing work. Since then I have etched numerous pieces, including bookmarks, bracelets, rings and other jewelry. Through experience and trial and error, I’ve come up with a detailed process that gives me a perfect etch almost every time. Electrolytic etching uses mostly safe chemicals, and electricity. You don’t really need respirators or fancy gear to do this process, although it is a good idea to wear rubber gloves, eye protection, and protect your clothing. If you want more info on the chemicals used, you can search the web for the MSDS sheets on the chemicals listed below.
I am by no means an expert etcher. I just want to pass on the tips and tricks I’ve learned since I started etching, to hopefully make someone else’s etching go smoother.
Note: You can click almost any picture to see a larger version of it.
Equipment You’ll Need
Etching Copper, Brass, or Nickel Silver
- Copper Sulfate (or Root Kill, which you can get at a garden or hardware store)
- A copper pipe or sheet or any piece of copper that is somewhat large
- copper, brass, or nickel silver sheet
Etching Steel
- Iron Sulfate. You can sometimes get this from a hardware store on special order (I got mine from Ace Hardware)
- A steel bar or other piece of steel
- steel sheet
Etching Silver
- Cupric Nitrate for sterling or fine silver – you can get this online from various chemical companies. I get mine from the Science Company. You can also use silver nitrate for silver but I have never tried it.
And, you can also use phosphoric acid for both sterling and fine silver, but unfortunately it leaves behind a pitted surface where it etches, so I won’t be talking further about this chemical here. - A copper pipe, etc
- Silver sheet
Items For All Metals
- A plastic bucket (not metal!)
- A car battery charger – preferably one that outputs 12 volts at 12 amps; I use the Schumacher SE-1275A that I got from Home Depot for around $70
- Heavy gauge (12g) copper wire or some copper sheet bent to form as a holder; you can get the copper wire from the hardware store in the electrical section.
- An iron
- A roller (hard or soft) – you can get these at a craft store; you will be pushing on this pretty hard so try to get one that has a metal frame, not a plastic one
- An old spoon
- A computer – to create your design
- A laser printer – to print out your design (Note that Brother brand laser printers use a different kind of toner that does not work for this process)
- Some black and white line art designs – see below
- Glossy laser or copier paper (the cheap kind).
- 3M Green Scotch scratchy sponge – you need the green kind that will leave scratches on metal (or a “satin” finish) to really clean the metal
- Dish soap – I have found that Dawn works best to remove oils from the metal. If you happen to have some “Penny bright” copper cleaner you can use that too.
- A brass brush (you can get it at a hardware store or preferably use a jewelers brass brush).
- A hard surface to iron on (not an ironing board, but something else, like a piece of wood or wooden desktop surface on which you can press down really hard)
- Liver of sulfur, selenium toner, or spray paint for metal surfaces – you can get liver of sulfur from Rio Grande, and you can usually get selenium toner from a good photography shop (no, not CVS); or you can use any flat spray enamel for metal that you can get from any hardware store (do not use gloss as it is really difficult to remove from the raised areas)
- Lacquer spray for metal (if you are doing copper or brass) – this is used to protect your work when it’s done
- A couple of bench blocks or other smooth surfaced blocks
- A dish for soaking (that you will never use to eat off again)
- 1200 or 2000 grit sandpaper. This will be used to remove patina from raised areas without removing the etched design.
Preparing the solution
For copper, brass, nickel silver and steel, fill the bucket with water leaving plenty of space at the top so it doesn’t slosh around and spill when you have to move it later. Add the chemical (copper sulfate or iron sulfate) to the water somewhere around a cup at a time (you can just eyeball it). Stir the solution until the chemical is dissolved. Keep adding the chemical and dissolving it until it will not dissolve any more. This creates a saturated solution. You can keep the solution pretty much forever. As you etch, more copper or iron will end up in the solution, which is great, because that is what causes the copper/iron to move off the metal you’re etching across to the pipe or piece of metal on the other side. You may need to filter out the crud at the bottom every once in awhile. Brass and nickel silver are made of mostly copper, that’s why copper sulfate works for them. You can reuse the same copper sulfate bucket for all of the copper-based metals (copper, brass, and nickel silver).
For silver, pour, very slowly, about a cup of cupric nitrate into a gallon or two of water and stir. Try not to raise any dust from the chemical while you are pouring. Make sure you have sufficient breathing protection for this (dust mask etc) because the dust is dangerous to your health. Please read the MSDS on this chemical for further information.
I keep three prepared buckets of chemicals that I reuse over and over again. One with copper sulfate in it, one with iron sulfate, and the last with cupric nitrate (all labeled of course).
The size of the bucket depends on the size/number of the pieces you expect to work on. You don’t really need a huge bucket unless you are doing huge pieces. The piece just needs to be totally immersed. You can even use a flat dish instead if you have a long piece. The less space between the piece and the negative side, the faster your etch will be. Unfortunately, you probably can’t do this for silver as it etches VERY quickly.
When you’re done etching, cover the bucket and put it somewhere it won’t get knocked over. For the cupric nitrate, pour the solution slowly into another bucket until all you have left at the bottom is some white goop. Throw that goop out (in the toilet or outside?) and pour the liquid back into your original bucket. When you remove the pipe (or other piece) it will have a bunch of crinkly bits on it. It’s ok, it’s just copper (or whatever metal you etched).
I have also heard that you can use plain salt for your etching solution on copper, brass, nickel silver, and steel and that it only takes 5-10 minutes, but you have to replace the solution after a few etches. I’ve only experimented with it once, mistakenly on silver, and it didn’t do a deep etch at all and took 3 hours.
The Design
Choose a black and white line art design, either from a clip art book (Dover has some excellent ones), or one that you draw yourself and scan (you must scan it as black and white line art or convert it after scanning). You can use photographs or grayscale art but you will need to convert it to black and white. Converting to black and white is a whole topic on its own that isn’t covered here. The great thing about using this etching process is that you can use designs that are either coarse or have very fine detail (you’ll see examples later).
You need to determine what areas of your design you want to be raised and what areas you want to be etched. The etched areas will end up dark (colored by the liver of sulfur or paint) and the raised parts will end up the color of the metal. Here are two examples:
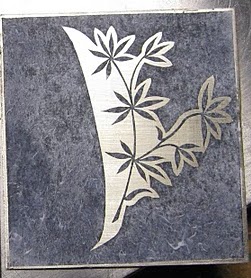
As you can see in the below example, the leaves are black (toner) and the background of the leaves is white. When this is etched, the leaves will be the parts that are not etched away, i.e. they will be the color of the metal. The white areas will be etched and end up colored blackish by the liver of sulfur. (In this example, the liver of sulfur was sanded away from most of the background too, leaving just a shadow around the leaves).
As you can see in the below example, the lines of the drawing are white and the background is black. When this is etched, the lines will be etched and will end up blackened by the liver of sulfur, whereas the background will be raised and the color of the metal.

Once you determine which parts you want to etch away and which you want to leave raised, you will need to make sure the parts you want etched away are white and the parts you want to leave raised are black. You may need to invert your image to achieve this. It’s sometimes difficult to determine in your head how you want to do this. I have no sort of rules to guide you unfortunately.
After choosing your design, get it to the right size. Make sure you save it as 300dpi or higher if it has fine detail. To save on paper costs, you can fit as many designs as you’d like to etch now or later on one sheet of paper. I highly recommend that you put at least two copies of each design on the page because if the design doesn’t transfer properly you will have to go and print it out again. Believe me, this will happen more than you would like it to!
Prepare the metal
Measure your design to determine the size of the piece of metal sheet you’ll need to cut out. If your design does not have a good border, I highly recommend cutting the metal bigger than the design as if you don’t, the toner may not stick properly (you’ll see examples of this common problem later in the Troubleshooting section). Once you determine the size, use a square/ruler to measure and cut your sheet metal. I don’t recommend that you file or sand your edges yet as the etch may make them rough again; you should do that after the etch.
Once you’ve cut your metal, you need to make sure it’s completely flat. If it isn’t, you can use two steel blocks and a mallet to flatten it. Place part of the metal in between the steel blocks, hold the upper block in place and hit it with the mallet (watch out for your fingers). Do this all the way down the metal. I find that if you offset the blocks and hit away from the edge where it meets the metal the metal will not get marred by the blocks.
Once the metal is flat, you need to clean it. Use some dish detergent and the green scratchy sponge to clean the metal across the width of it, and then along the length of it. Make sure you do not touch the metal with your fingers as they will leave oils on the metal. The reason to clean in two directions is to make sure you remove all the oils and dirt that may be on the metal. Doing it along the length last leaves the scratchy sort of satin finish going along the length of it (you’ll see details of this in the following picture). This satin finish helps the toner stick better. When I originally learned etching, we used acetone next to further clean any oils off the metal, but I’ve found this usually isn’t necessary if you clean it well enough with the green sponge and don’t touch it again. Thoroughly dry off the metal with a paper towel or old dish towel (again making sure again not to touch it).
Cut your design out of the paper, place it toner side down on the metal and tape it in place making sure it’s flat. If you don’t tape it, it will slide. Put your piece on the ironing surface.
Transferring the design onto the metal
Turn on your iron to the highest setting. Lay the iron gently on the piece vertically without pushing on it. If you push down the paper may slide. Leave the iron there for a couple minutes.
Take the iron off the piece. Use the roller, pressing firmly, roll back and forth along the piece. This will start to get the toner sticking to the metal.
Next, take an old nail or chopstick or something that won’t burn (i.e. not your finger), and hold down the paper and metal with it while you rub the paper really hard with an old spoon, all over the piece. This will force the toner to stick.
You will need to heat and spoon the piece at least three times (you don’t need to use the roller again). If your piece is large, you will need to heat and spoon the different areas separately, at least twice per area. When it’s done, you should actually see most of the black parts of the design right through the back of the paper.
Note that if your design has large white spots (where there is no toner), those parts of the paper may form a bubble. That’s ok! If a bubble forms on a part of the piece that has toner, that’s not ok! This will be discussed more in the Troubleshooting section.
By now the toner should hopefully all be transferred to the metal. Turn off the iron. Pick up the piece with tongs or tweezers (don’t touch it, it will be hot!) and immediately put it in cold water in a dish to soak for a few minutes. Make sure the entire piece is below the water. The water must be cold in order for the toner to cure onto the metal.
After a couple minutes the paper should be mostly wet. Again, there may be bubbles if your design has large spaces of no toner (and that’s ok). Take the piece out of the water and push your thumb in a downward motion away from you to start rolling/peeling the paper away. The paper should peel away pretty easily. You can re-soak the piece as many times as you need, to to get all the paper off. Eventually all that should be left is black toner, and the metal, and maybe some white spots on top of the toner (but there should not be any white spots on the metal).
If you end up removing some of the toner while you are removing the paper, don’t worry too much, it may be fixable. You can usually correct that with a paint pen (make sure the painted areas are completely dry before continuing) or masking tape depending on how small the problem is. However, sometimes you just end up taking off some detailed part that you can’t easily fix. Don’t even try. It takes very little time to redo the toner transfer. Just start over. You’d rather have a good etch than a sloppy one. This will be explained further in the Troubleshooting section. I’ve found that using a Sharpie does not work well at all and comes off in the etch solution.
Etching the piece
Attach the wire to the back of the metal with masking tape. I’ve found that less liquid leaks into the tape on the back if you bend the wire upward, so it’s perpendicular to the metal, ripping the tape at the point where the wire needs to come up, then tape above where the wire originally was, and push it back down and tape again over it (sort of creating a pocket of tape containing the bent part of the wire and where there is only a small hole where the wire is coming out, i.e. you get 2-3 layers of tape around the wire.

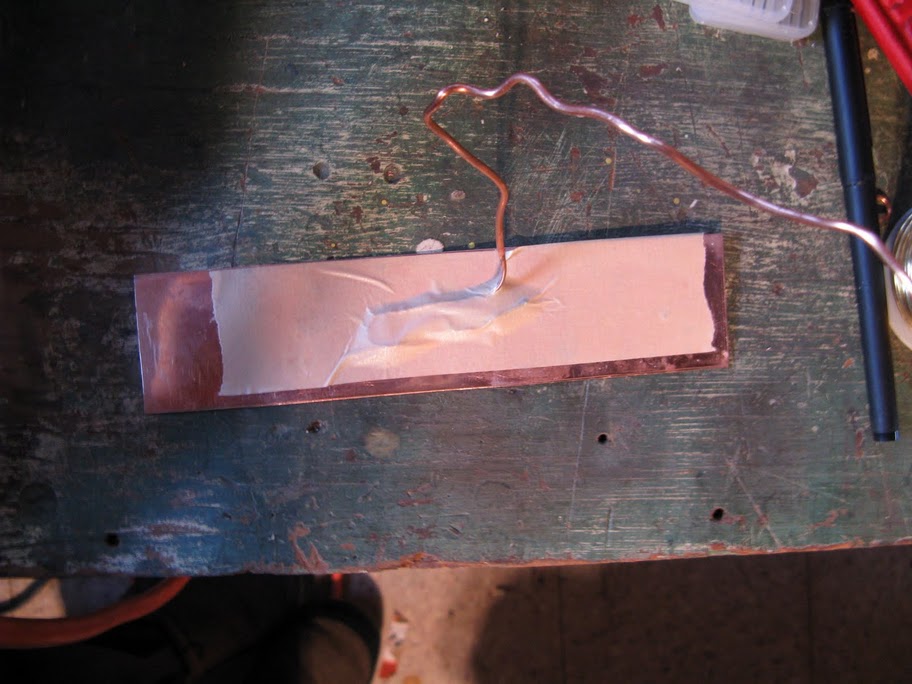
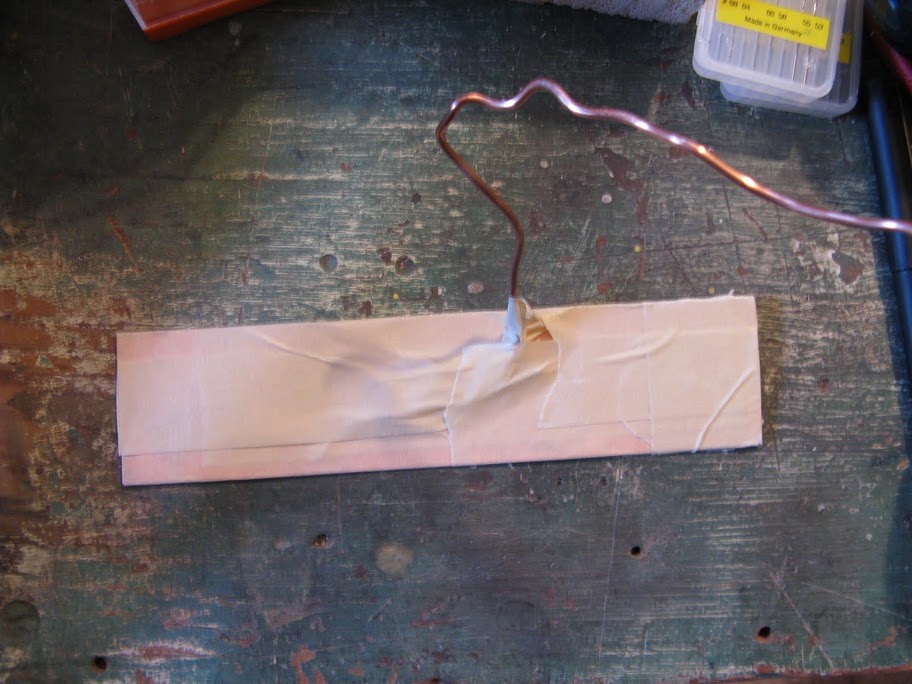
Tape the entire back of the piece. This should protect it from being etched. If your piece has a border like this one did and there is some metal showing that was supposed to be covered with toner but got scratched off (see the picture at the end of the last section), you can also tape that off, like below. Depending on the design, you may want to do this anyway to protect the edges.
Make sure the car battery charger is NOT plugged in. Hold the copper pipe (or piece of steel) in the solution on the side of the bucket. Attach the black lead from the car battery charger to the copper pipe and the side of the bucket (if it will fit). This will hold the pipe in place in the bucket, if it doesn’t you can use a clamp. Attach the red lead from the car battery charger to the wire coming from the piece. Bend the wire so you can place the piece in the solution and have the wire hang off the side with the red lead. Place the piece in the bucket so that all sides of the piece are the same distance from the pipe, if you can. If it’s lopsided, the parts farthest away from the pipe will etch less than the parts closest to the pipe and you’ll have an uneven etch. You can actually etch multiple pieces at once (up to a certain point; i.e. you don’t want to etch many huge pieces because there won’t be enough juice from the charger, however you can do a bunch of small pieces). Just make sure none of the pieces is in front of the other. They can be on top of each other or side by side. Make sure the entire piece is in the solution and none of it is sticking up out of it.

If you are etching copper, brass, nickel silver, or steel, plug in the charger and go get some tea and relax, or go work on something else, and let the piece etch for about 35-45 minutes (or about 25-30 for nickel silver). Check back every so often to make sure the tape hasn’t peeled off and that everything is still connected (sometimes the wire will get eaten away). This will give you a really nice deep etch. If you leave it in less, it may not be deep enough to hold the color you apply later after sanding. You can experiment with the length of time you leave the item in, it all depends on what you’re trying to accomplish. You can get a really shallow etch in only minutes and you can get a really deep etch, e.g. halfway through a piece of 20 gauge copper sheet, in about 2 1/2 hours. There will be a lot of examples later on.
If you’re etching silver, you will need some kind of timer. It usually takes only 4-5 minutes to get a good deep etch in a piece of 20g or thinner silver (the same etch you get for 45 minutes in copper). I’ve had a 20g piece eat all the way through in 10 minutes. You have to keep an eye on it because it’s very very quick.
If you are unsure of how deep an etch you want, you can try to check by unplugging the red lead, taking the piece out of the solution, and feeling the etch. However, disturbing the piece can cause the tape to come off (sometimes it does anyway for a long etch even if you don’t touch it), and as I’ve found with steel and brass, the toner will come off if you touch it at all. I tend to just leave it alone and take out only at the end. If you have to disturb the piece you will most likely need to completely dry and re-tape the entire piece, including the wire.
When the etch is done, remove the piece from the solution. It will have a sort of sludge on it.
Removing the toner
Rinse off the piece and remove the wire and tape.
Using a brass brush, remove the toner, brushing very firmly. It will work really quickly and won’t take off any of the metal from the design.
Some people say that acetone will get the toner off, however, I have never had any luck with it, I still have to scrub just as hard to remove the toner. I’ve also tried using paint remover but that’s pretty harsh stuff and I don’t recommend it (and it’s hard to clean it off after; you get a residue left behind that makes it harder to color the piece).
Once you get all the toner off, you’re ready to clean up (file and sand) and color the piece.
Cleaning up the metal, etc.
Do any cleanup, i.e. filing, sanding, polishing, of the piece that you need to do (leave the etched side alone). Now is also the time to do any further fabrication you need to do, e.g. dome it, solder it to something, etc.
Coloring
Clean the metal thoroughly with dish soap and a toothbrush. If you have liver of sulfur, you can use it on copper or silver. I’ve found that it doesn’t work well on brass or nickel silver. It doesn’t work at all on steel. You can also use selenium toner on anything but steel (as far as I know). If you would rather just use paint, I recommend a flat spray enamel. Spray it on sparingly and let it dry thoroughly before continuing to the color removal section. It may need more than one coat to get all the areas covered; multiple coats are fine as long as you don’t spray it on too thick. If you use gloss paint it will be too goopy to remove afterward.
There is a ton of info on the web about using liver of sulfur, so it won’t be covered here. However, I do have one tip. Liver of sulfur will last FOREVER if you fill the container you mix it in completely with solution and leave no room for air, and then cover it. I’ve had a batch of the stuff in a jar for about 6 months now.
I don’t know too many other web sites that mention selenium toner. Selenium toner usually comes in a liter container with tiny a little opening. I usually pour some into a jar and cover it tightly. It smells really bad, like ammonia, and you should only use it in a well ventilated place and wear protective gloves. To use selenium toner, briefly dip the piece in the toner. It should blacken pretty quickly. Don’t let it sit long or it will end up flaking off and you will have no coloring at all. You can also paint the selenium toner onto the metal with a small paint brush. When doing so, use the paint brush to rub it in (or smoosh it in) as you go.
Removing the color from the raised parts
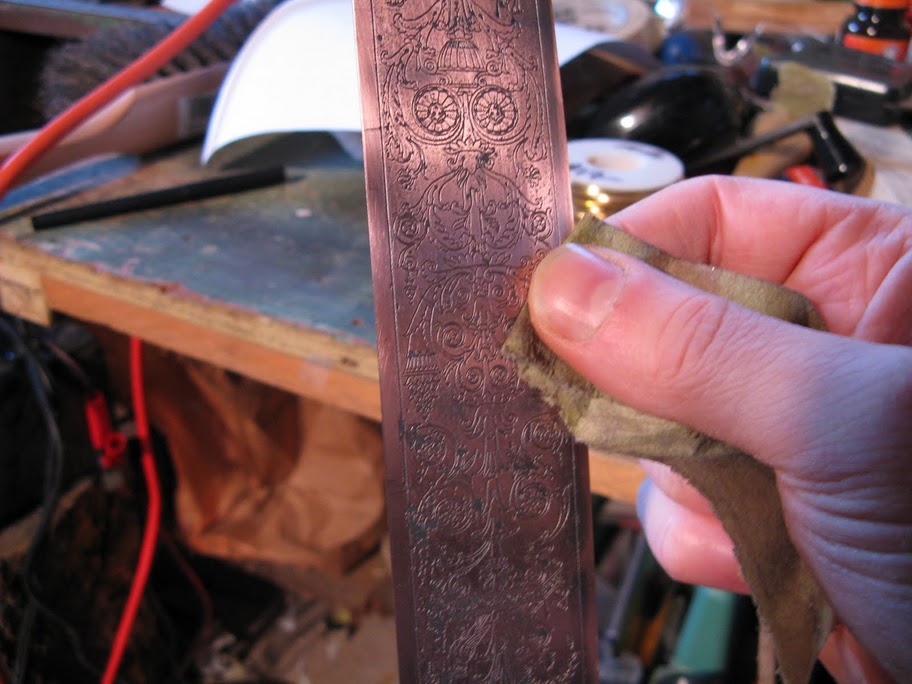
Whatever colorant/patina you used, the next step is to remove it from the raised parts so only the etched parts are dark and the rest is bare metal. I like to use a sanding stick for this. Just take an old paint stick and wrap sandpaper around it. Or you can use a sanding block. The idea is to have a flat surfaced sander so as to not remove the color from the deep, etched spaces. I.e. the flat surface moves over the raised parts of the piece and doesn’t touch the etched parts. If you sand it by hand, the unevenness of your skin pressure would allow the sandpaper to get into the etched parts and remove the color there (which is what we don’t want).
I like to start with 1200 grit sandpaper because it removes less metal. The less metal you remove the better, because when you sand you are removing some of the metal from the raised parts, making those get closer and closer to the level of the etch. 1200 grit will remove pretty much all of the color you need to remove, any higher grit except maybe 2000 doesn’t seem to work well, and lesser grits remove too much metal for my liking. Using your 1200 grit sanding stick or block, sand vertically, straight up and down the length of the piece to remove the color from the raised parts. You want to sand in only one direction. There may be some spots that are uneven (it happens all the time). Don’t sand too much, just get as much color as you can off. When you’ve done that, you can use a small piece of the same grit sandpaper with your thumb to get the sections you couldn’t reach with the stick. You have to be very careful not to remove the color from any large etched areas when sanding by hand.

Once you get the color removed from the front, you can do the same thing on the back.
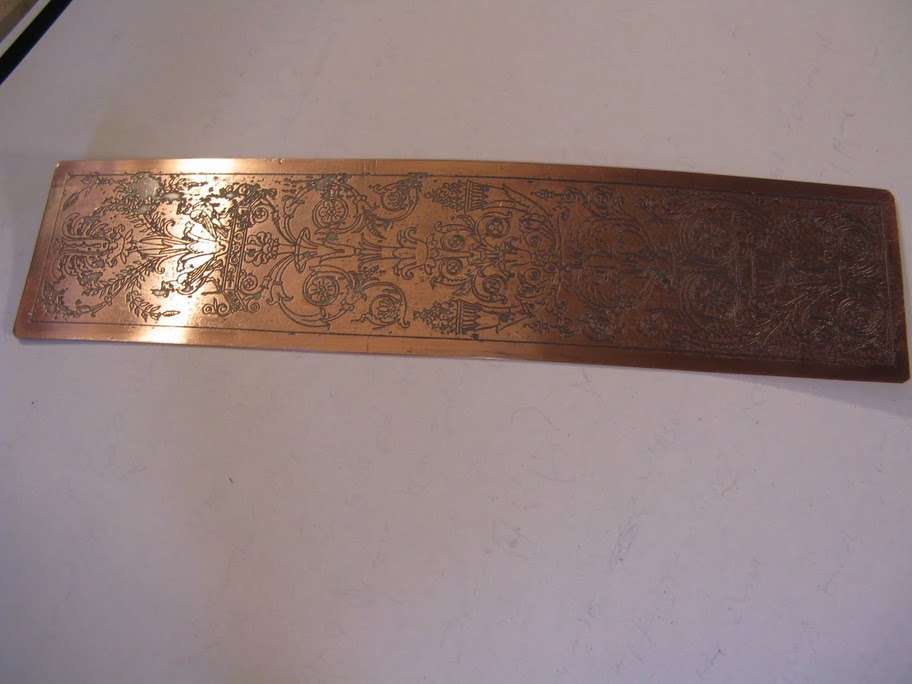
Here’s the final coloring on the front:
From this point, you can either sand with higher grit sanding sticks/blocks or buff it to get a higher shine. You always have to be careful not to remove the color from the etched places (unless you want that kind of look). If you remove too much color you can probably re-color it once, but after that, repeated sanding even with 1200 grit may end up removing too much metal, so be careful (this has happened to me, see the Troubleshooting section). Using a polishing or buffing wheel (either a big one, or even one in a flexshaft) will most likely remove all the color so you may need to find another way to buff/polish the piece afterward.
Protecting the piece
If you want, you can spray lacquer the piece to protect it. I usually do this when the piece is made of copper or brass and is going to be worn, like a bracelet or ring, because copper and brass can discolor the skin (usually turning it green). Also, if you don’t lacquer the piece, it can get smudged by people’s fingerprints. I usually spray lacquer the piece once lightly, let it dry for an hour and spray lacquer it a second time. For jewelry, I like to do three coats. Let it dry for at least a day before handling it or you may end up getting fingerprints permanently embedded on the piece. Make sure you lacquer only in a well ventilated area, preferably outside.
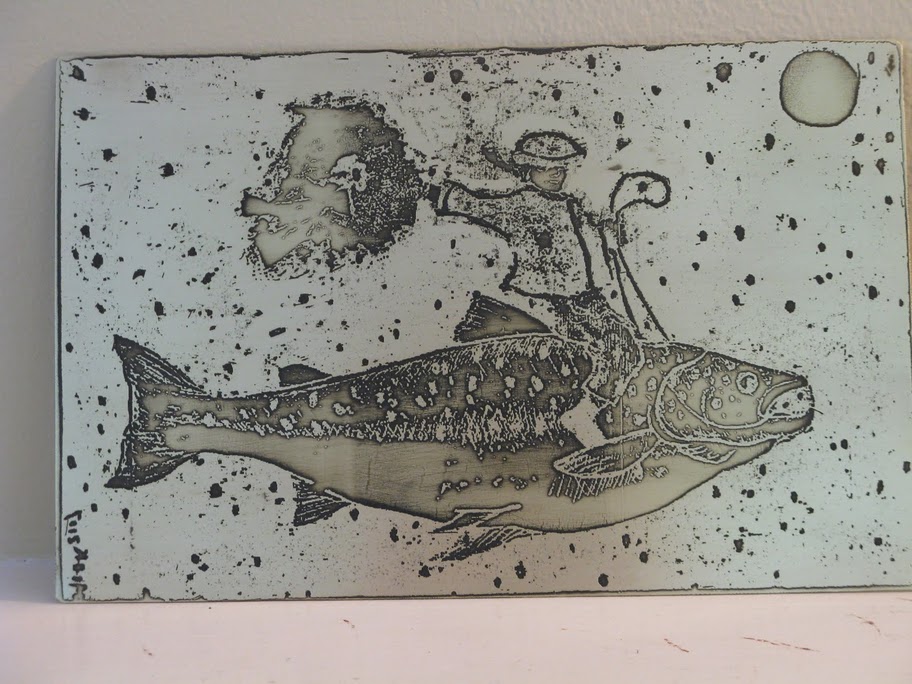
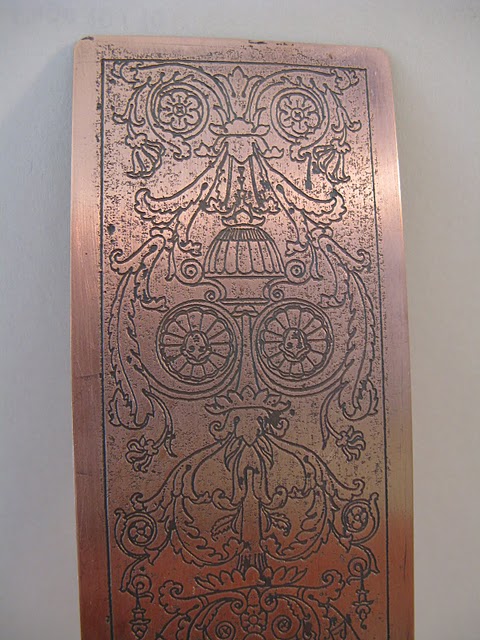
Examples
Here are some examples of things you can do with etching.
|
Kitchen fridge magnets |
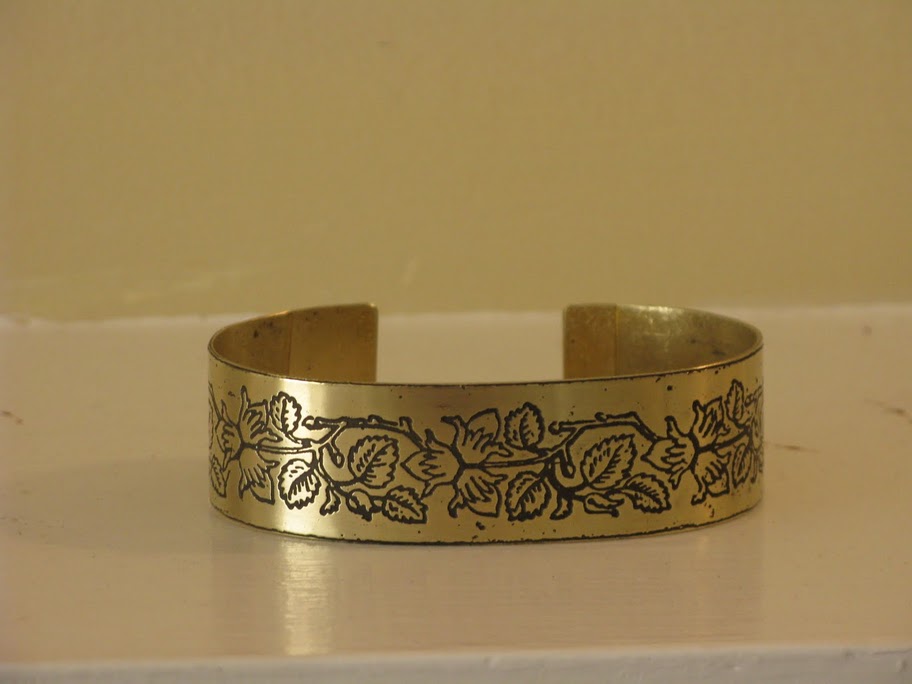
Bracelet (brass) |
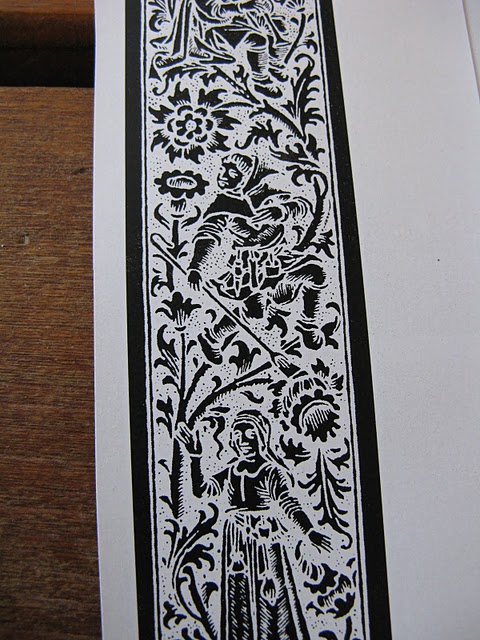
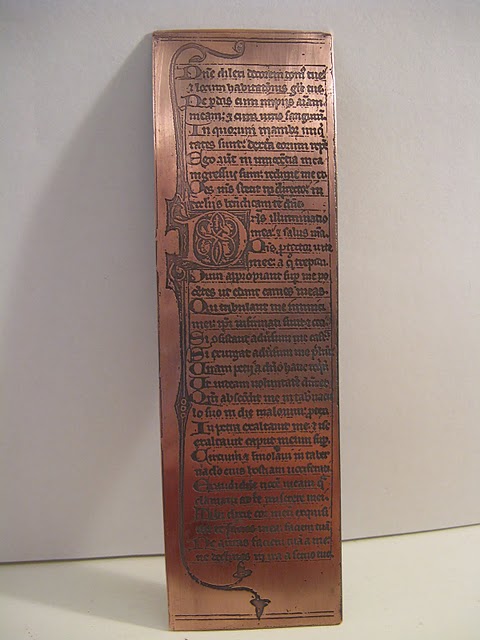
Another bookmark |
|
|
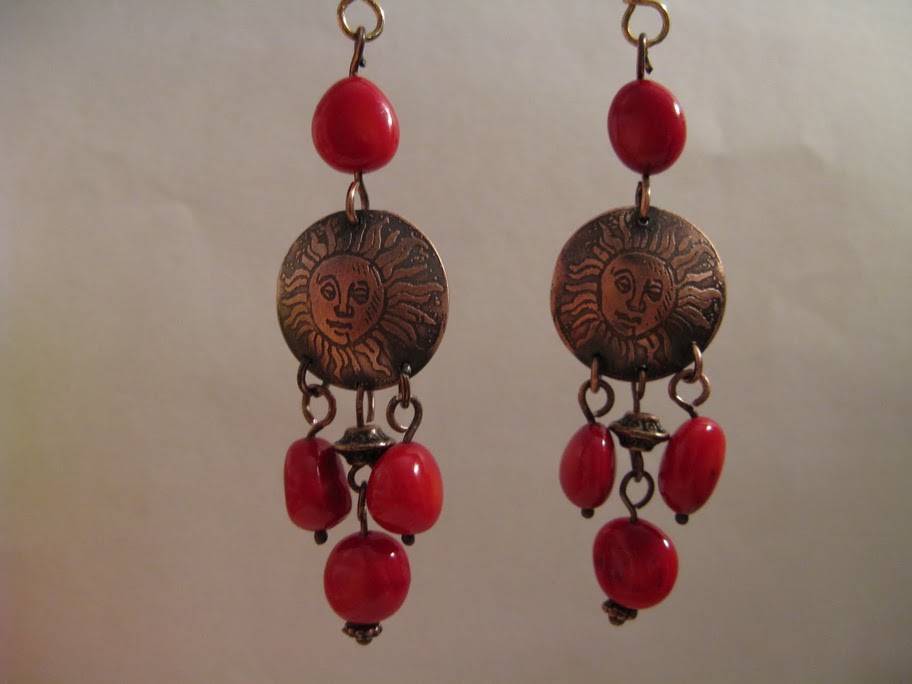
Earrings |
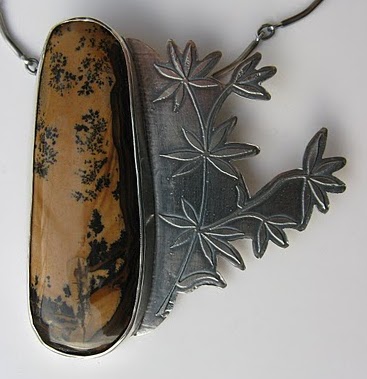
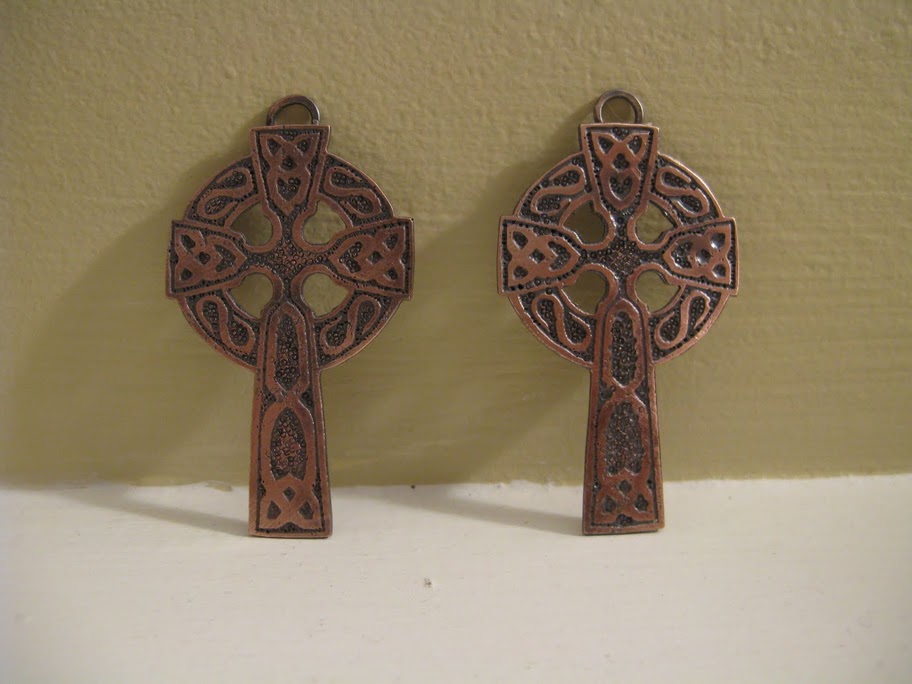
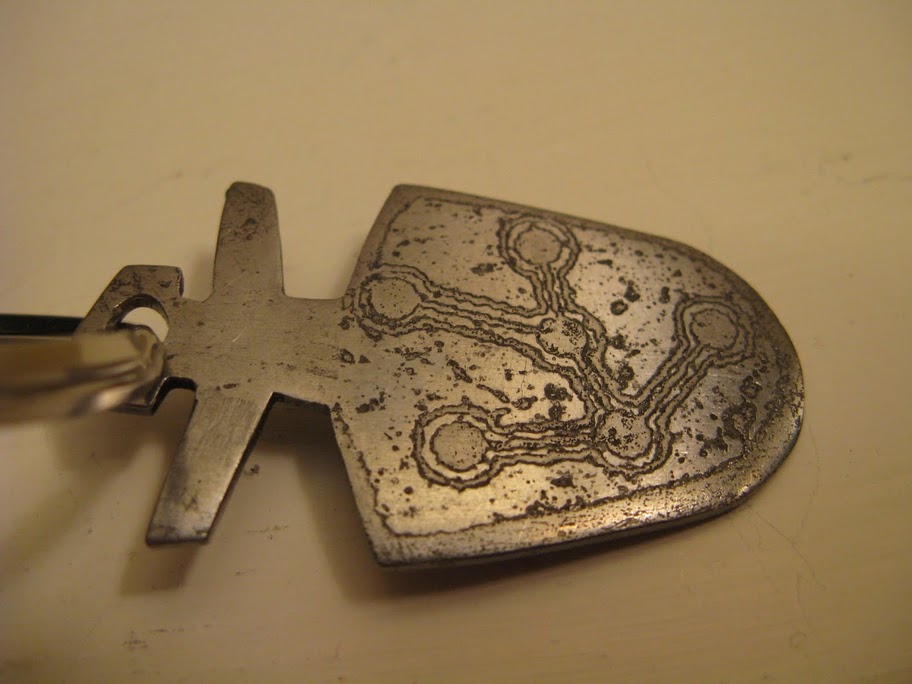
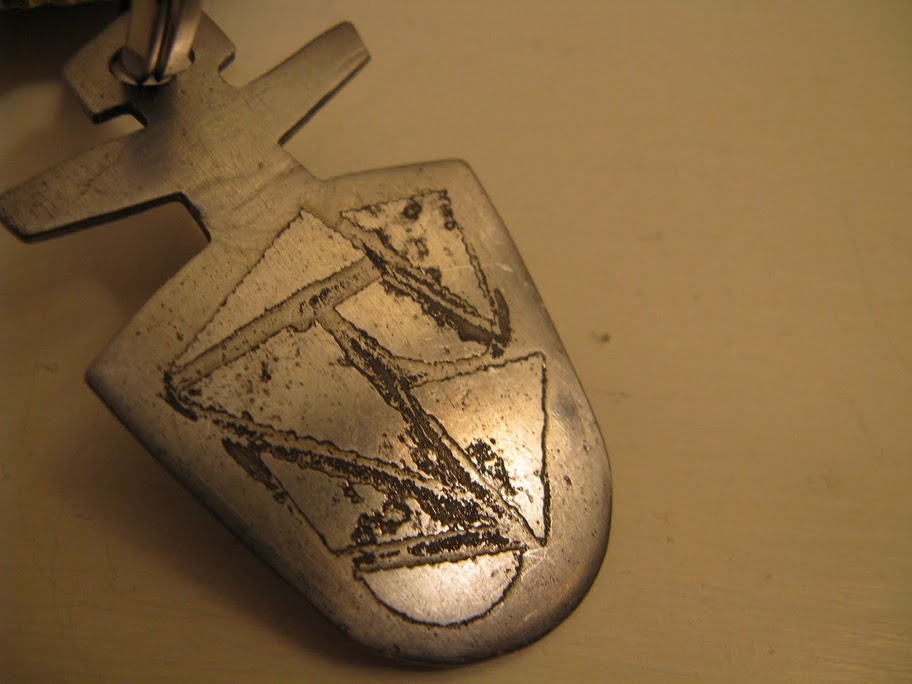
Pendants |
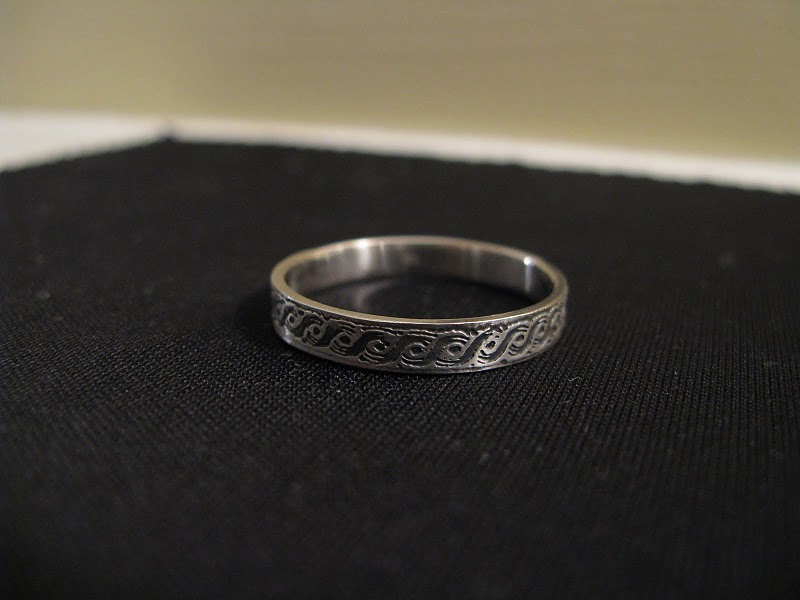
Ring (silver) |
|

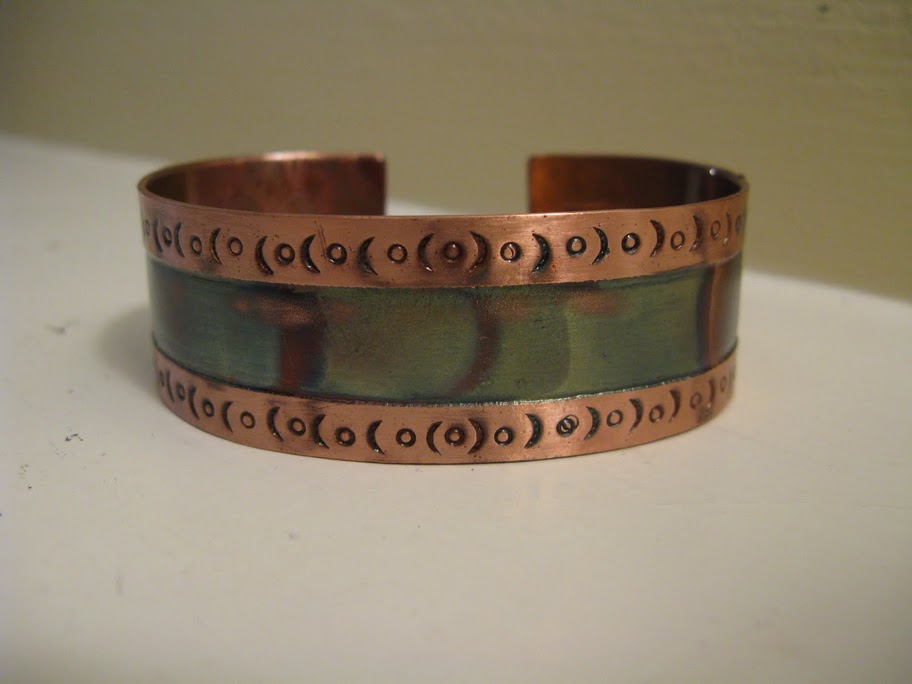
Another bracelet – this is an example of a deep 3 hour etch. The part I etched was the inside channel of the bracelet. It’s 20 gauge copper and it etched about halfway through. The moons and suns were punched, not etched.
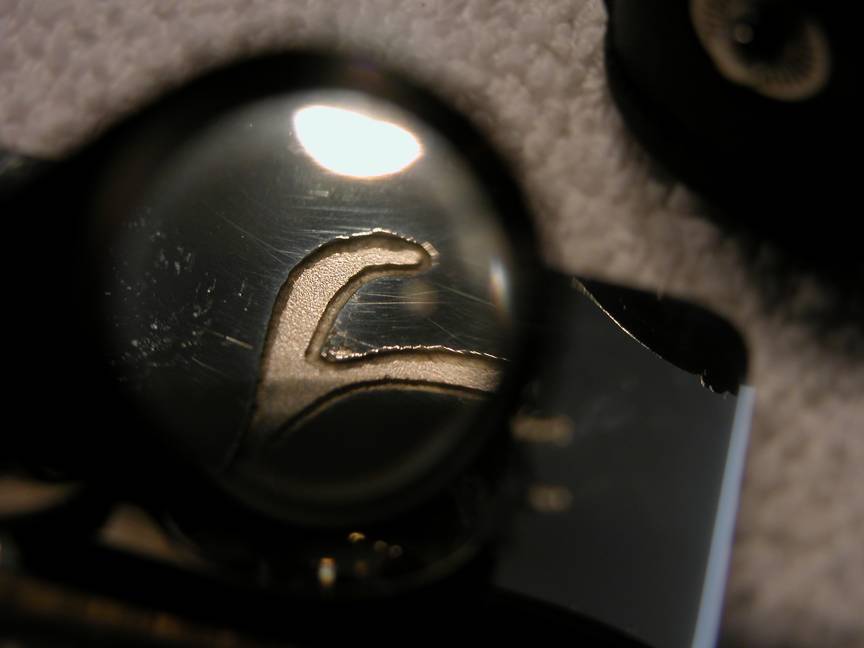
When I etch a piece of jewelry, I like to also etch my signature mark (or stamp) onto the back of it (I have a whole sheet of these made up just for this purpose):
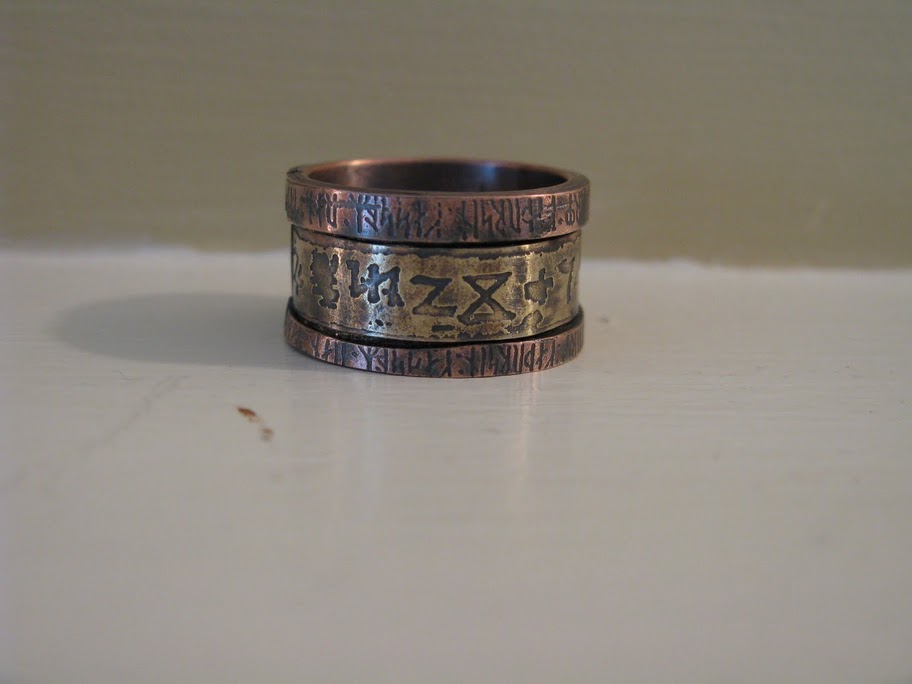
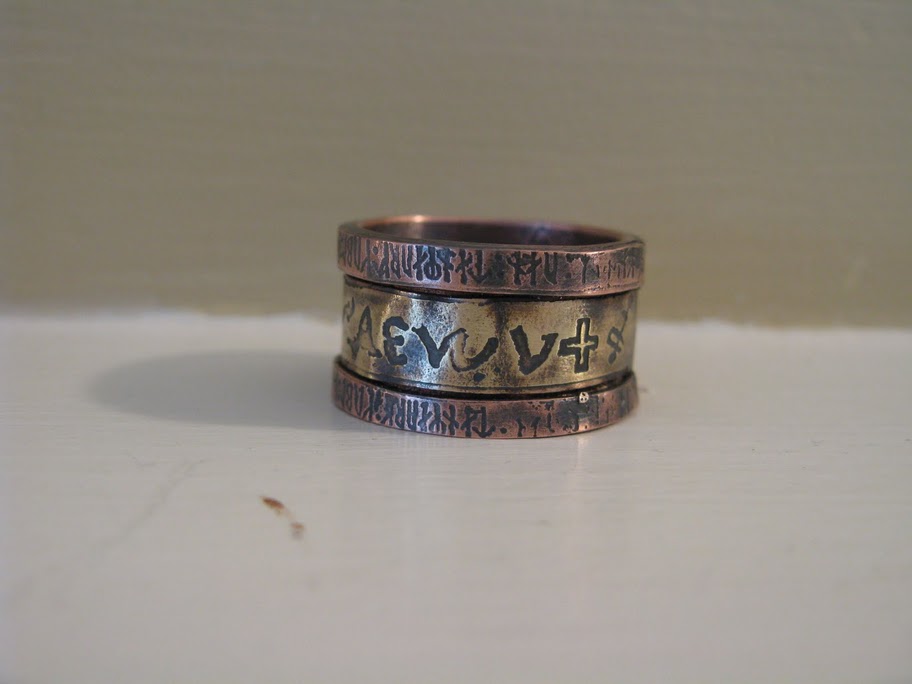
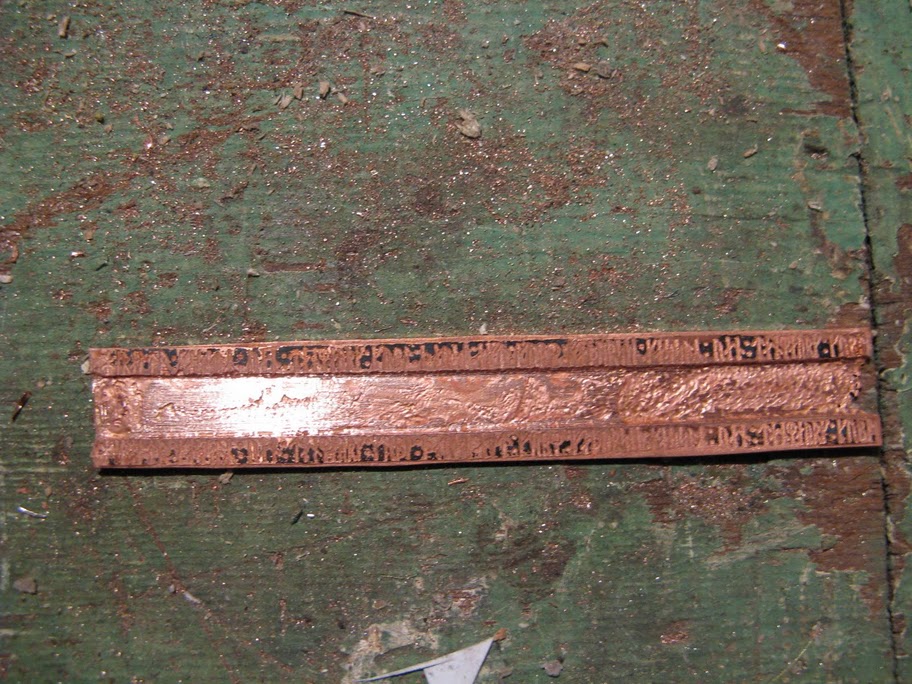
Ring – I made this by etching the runes onto one piece of copper and separating it afterward with shears. At the same time, I etched alchemy symbols onto a piece of brass. At the end I soldered them all together.
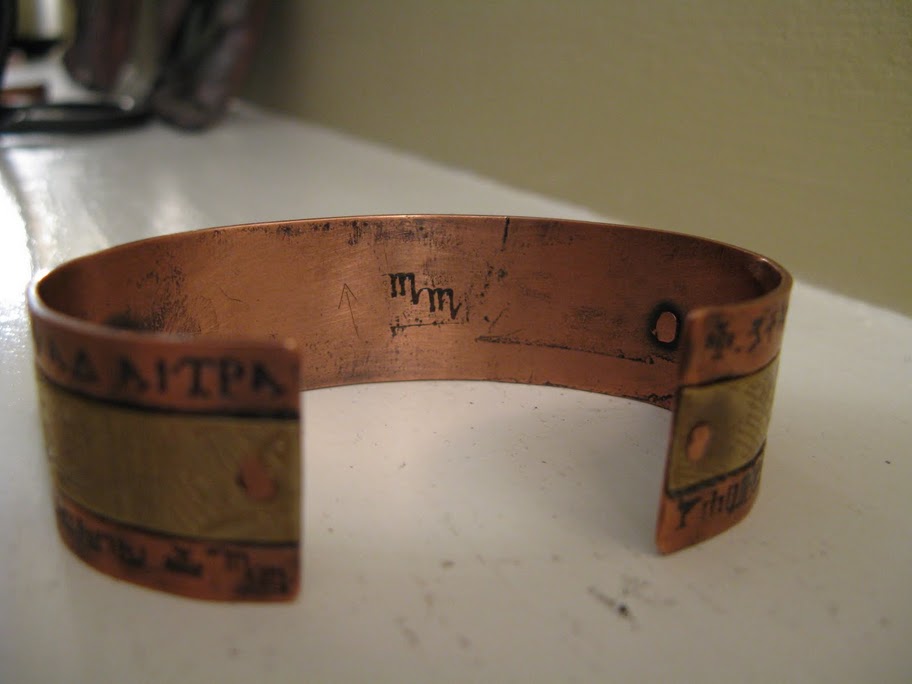
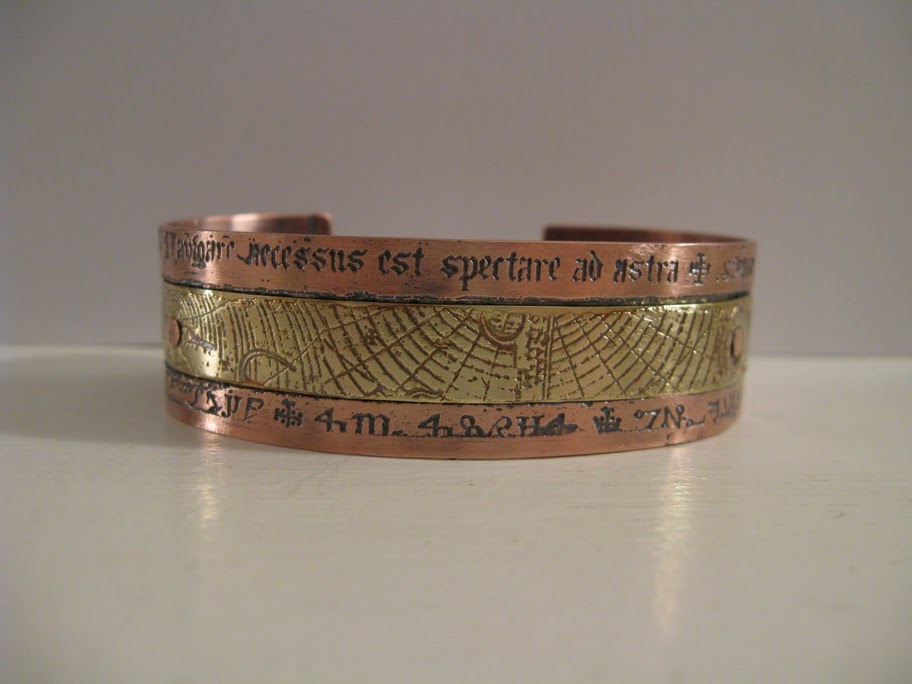
Another bracelet – this one was made by etching the copper band first for 3 hours to make the channel in the middle that holds the brass part (as I did with the greenish colored piece above). Then I etched the words into the copper and the design into the brass, both together at the same time, for 45 minutes. Once the etch was done I riveted the brass into the channel on the copper band and shaped it.
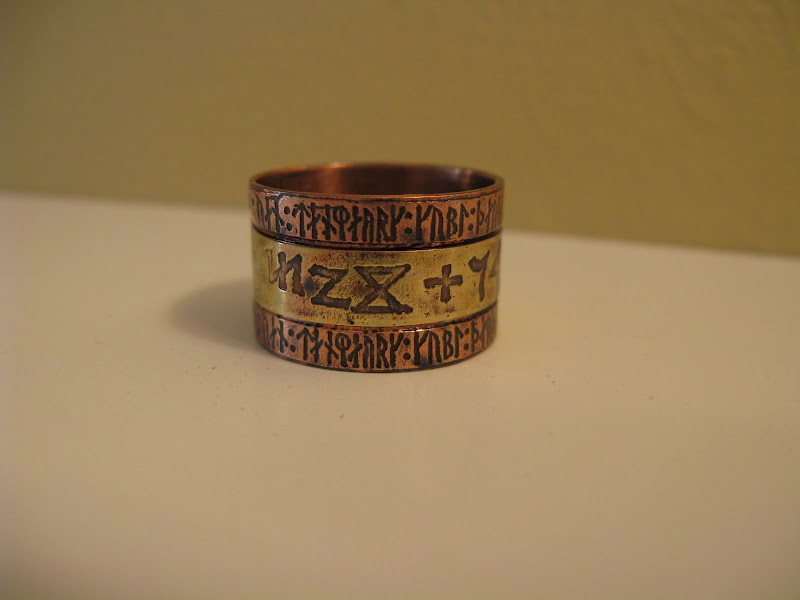
Another ring – this was made in the same manner as the above bracelet except the inner band was soldered instead of riveted.
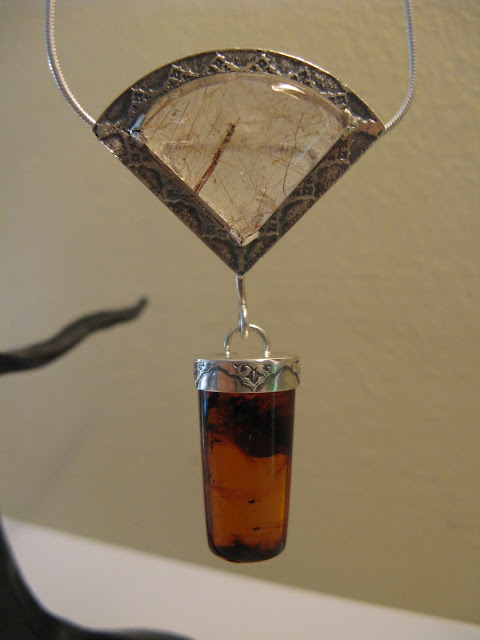
A pendant and an etched bezel (sterling silver) – this pendant has an etched border on the sheet backing around the top quartz stone and an etched bezel (26 gauge) around the piece of amber. It’s my favorite bezel! I etched the bezel with cupric nitrate and I think the pendant part with phosphoric acid. You can see how smooth an etch you get with cupric nitrate compared to phosphoric acid.
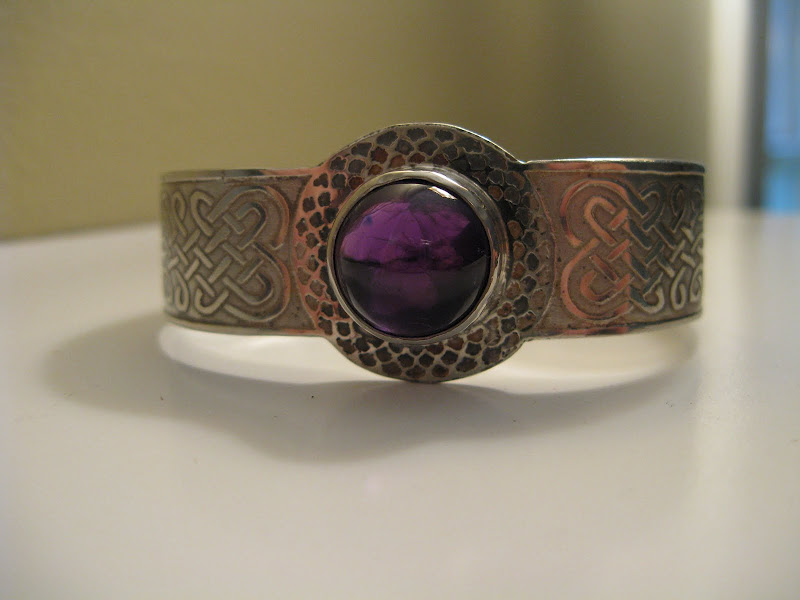
Another bracelet (nickel silver) – this was made with two separate patterns, one for the area surrounding the amethyst and one for the bracelet band.
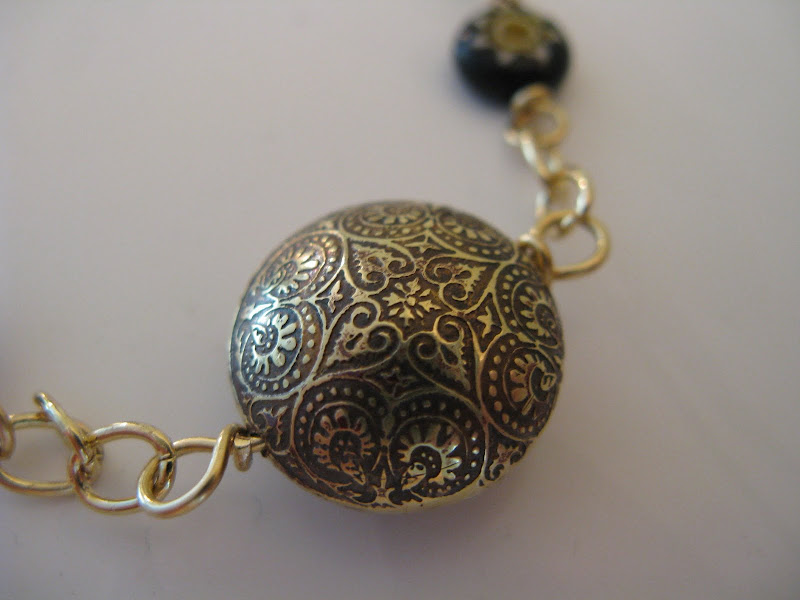
A bead – I etched two circular patterns onto a small sheet of brass and then cut them out and domed them and soldered them together to make this bead.
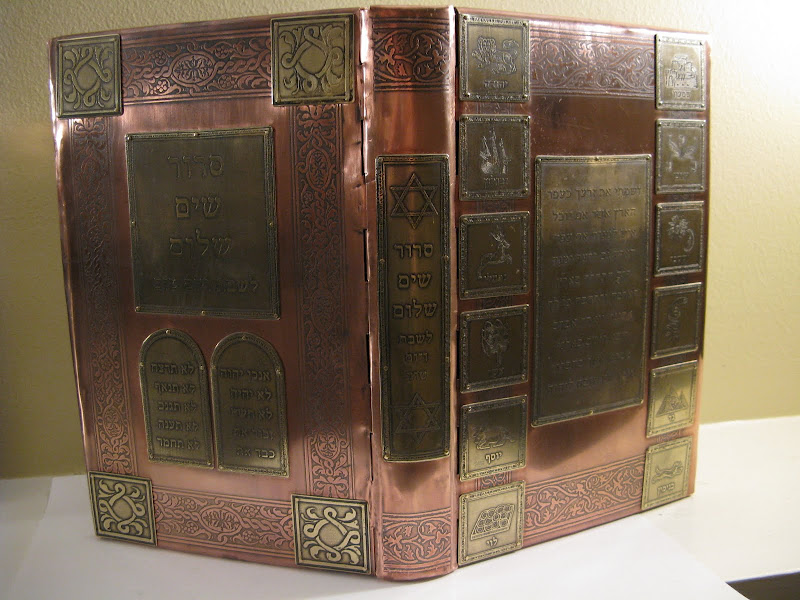
A book cover – I etched two huge sheets of copper for the base plates, and one thin one for the spine base. I then etched three sheets of brass, one containing the 12 square elements of the right side of the piece, another containing all the elements of the left side of the piece, and another containing the recangular inside of the right side and the spine. Because of the size of the pieces I had to do multiple etches separately, however, I was able to combine a lot of the brass bits together on just a few pieces of sheet metal.
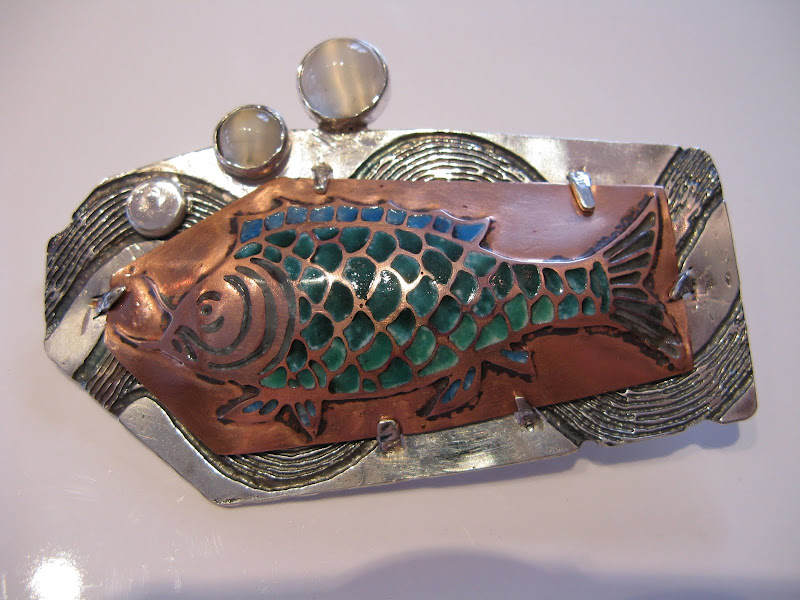
An enameled pin – This is an example of a technique of enameling called Champlevé. You basically do a very deep etch to make cells that you can then put enamel into. The silver backing was also etched.
As you can see, you can do some pretty complex things with etched metal.
Troubleshooting
This section contains some common problems you may run into and how to deal with them.
Over-sanding when removing the color
If you make a mistake when removing the color and have to re-color and sand more than once, or you use too coarse a grit or sand too heavily, you can remove too much of the raised area, making it blend in with the etched parts. Note the background areas in the picture on the left where the color was sanded away around the head of the monster. This is caused because the raised area is now too close to the level of the etch. You can almost see that the etch is no longer deep enough. In the right picture, you can see that there were etched areas that were just too large and the sanding stick got into those areas anyway, even though I still wanted them colored (note the moon and the wreath in her hand). This can also happen if you aren’t careful enough when you sand these areas by hand.
Too long of an etch
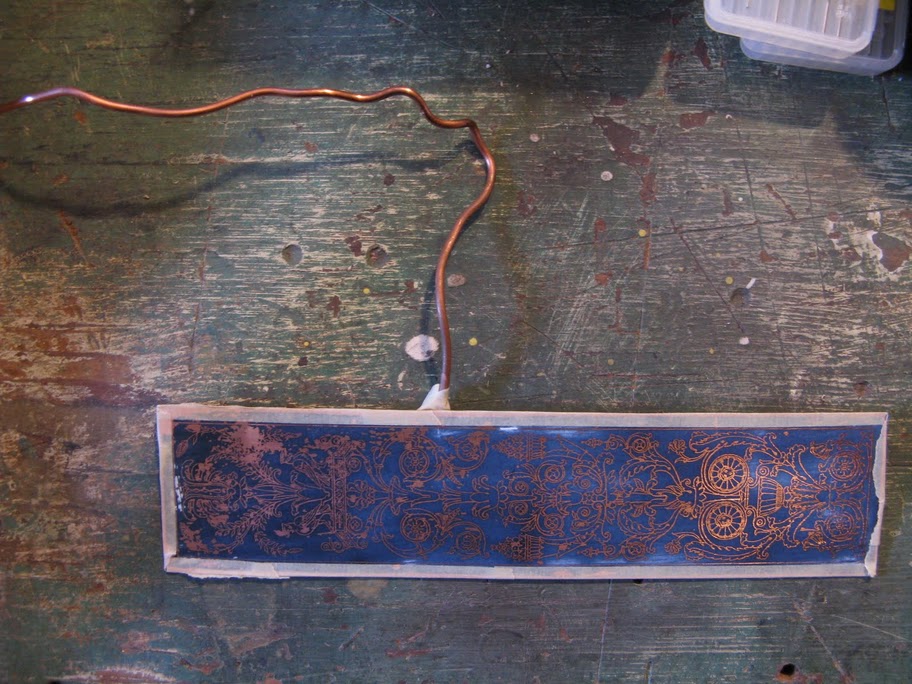
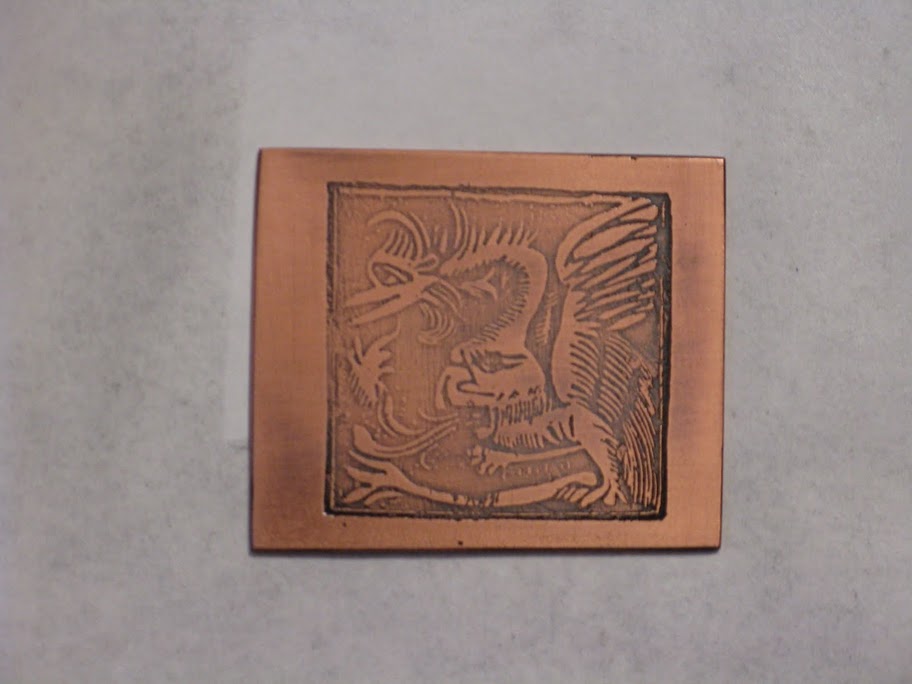
When you leave your etch going too long, even though there is toner in a certain area, it will eat away at the sides of the toner covered area and also underneath it. (This image was taken from John Flynn’s silver etching article)
You can see that clearly in this picture. Note the roughness of the edges. You can see it also in these pictures along the edge of the inside channel of this picture (not the jagged bit on the right but on the top and bottom edges of the channel):
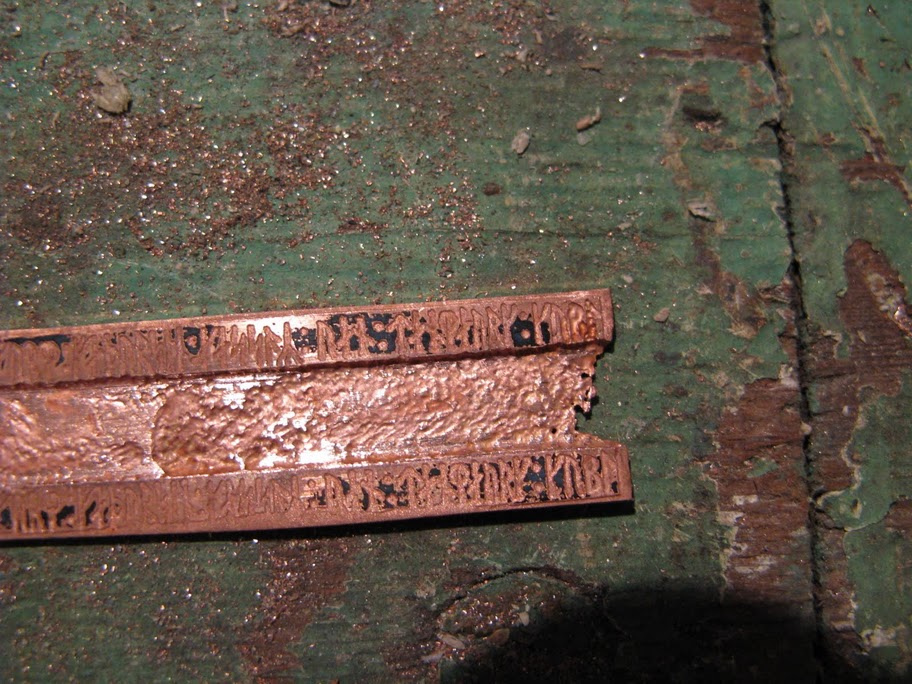
You’ll also note that the end of the piece in the picture is totally ragged and eaten away. This is from not protecting it with tape during the 3 hour etch I gave it. Luckily for me, I cut this piece an extra centimeter long on purpose so I could later size it for someone as a ring (I knew I would be cutting the ragged part off anyway so I didn’t bother protecting it). Also, note that the middle channel in the left picture is what a 3 hour etch looks like, you probably won’t be able to clean this up, so you probably will only ever do that deep an etch if you’re covering it up with something, like I did in the right picture (covering it with brass). You can actually etch all the way through a piece. I’ve never tried this so I don’t know what it looks like.
Dots and nicks

As you’ll notice in these two pictures, there are black dots and nicks over entire areas of the piece. These are caused by toner not being transferred properly. If you don’t heat up portions of the piece long enough and/or don’t give them a good rubbing with the spoon, this can happen. A lot of times you can see where this will happen once you’ve removed the paper backing. You’ll see holes in the black toner. You can usually fix these before you etch by using a paint pen. Make sure the paint dries completely (for at least an hour or quicker if you use a heat lamp) before etching or it will come off in the etch. I have found that Sharpies do not work at all and come off in the etch bath. You can also use tape to mask off larger areas. Some people actually like the dotted look; it gives the piece an aged kind of character. A colleague of mine likes to use a special green plastic toner transfer paper to deal with these holes; the green plastic, when heat transferred to the metal, completely covers the toner areas (including the dots); I’ve never tried this and don’t know what it would do to highly detailed areas. Because this happens so often, I have actually switched to using photoresist plastic instead, which brings along it’s own set of problems. I have not documented this process and probably won’t ever get around to it, but I get my resist and got instructions for how to use it here: http://www.capefearpress.com/puretch.html
Masking gone wrong


If you don’t mask off your piece properly with tape, or there are openings in the tape, you will get jagged areas in your piece like the ones shown in the pictures above. This is due to the area at the edges of the tape being etched away. This tends to happen a lot on the backs of pieces where the wire touches. The etch solution tends to get inside the tape and causes parts of the area to get eaten away. Sometimes no matter how well you mask it it will still leak in. You just have to try to be as careful as you can when attaching the wire to not leave any holes. Luckily this seems to only happen on the backs of pieces. You can sand it away if you want. Another common problem is if you disturb the piece while it is etching, the tape can come loose and the solution will leak inside and cause this same problem. If you have to disturb the piece you will need to dry and re-tape the entire piece, including the wire. I’ve heard that at least one way around this problem is to solder the wire to your piece and then use some kind of spray on rubber like coating on the back of the piece. I’ve never tried the “rubber like spray” method so I can’t tell you much about it. However, you can’t solder a wire on after you transfer the image because it will melt off the toner. And doing it before you transfer your image makes it hard to keep it flat to iron/smoosh with the spoon. If you know anything about that please let me know!
The toner came off!
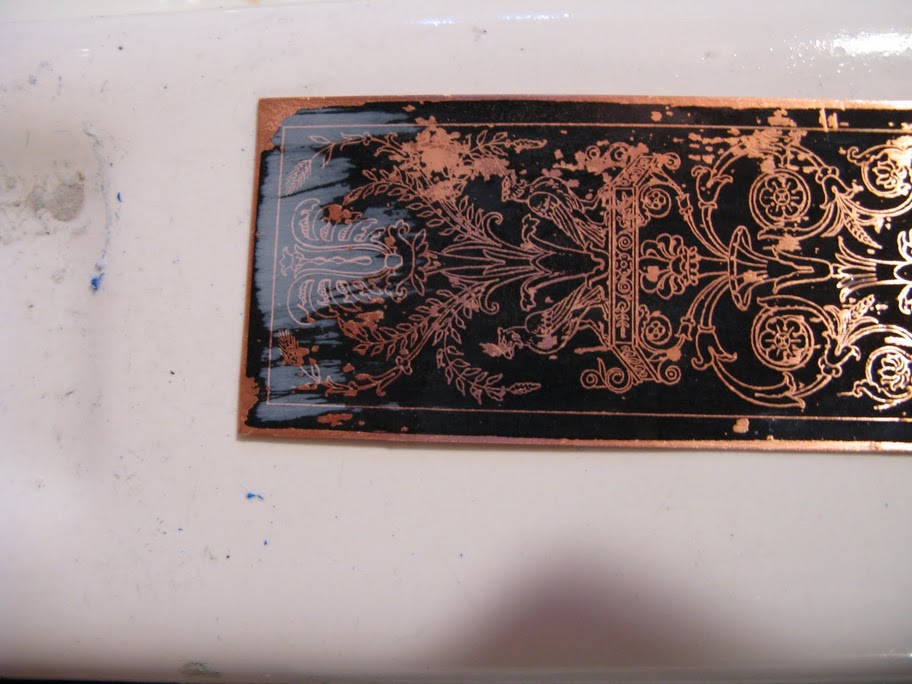
Sometimes, no matter how careful you are, the toner can come off. If it’s in an area like the very upper left corner (the border) of the left picture, you can either mask it with tape or use a paint pen. Unfortunately though, as you can see in the inner part of the left picture and most of the right picture, the toner came off in a very bad place. There really is no fix for this. You really don’t want to try to use a paint pen to re-draw these areas by hand. It’s not worth it. This is why I recommended that you always print at least two copies of your design. When this happens, it’s time to get out the brass brush, brush off all the toner, clean off the metal, and iron the design on again (i.e. repeat the process). At least you can still use the same metal. The number one reason for this problem happening is not heating up the metal long enough with the iron and/or not using the spoon enough to make sure the entire piece gets covered. In these two cases, I was in a hurry and didn’t heat up the metal enough. I went ahead with the left etch anyway and here is the result:

See that big black splotch there? It’s pretty ugly.
The 2nd biggest reason this happens is from pushing too hard with your finger on the metal when removing the paper backing. You really have to try to push only very lightly to get the paper backing off the metal.
Another reason this can happen is bumps in your metal (your metal isn’t flat). If you’ve tried ironing your design on more than once and this keeps happening, that’s usually the cause. You can either try to re-flatten the metal again, or get a new piece of metal. I’ve had this happen numerous times.
Ugly gashes, uneven edges, etc
You can see in the first picture that the edges are all jagged, and in both pictures there are gashes and nicks all over. This was caused by disturbing the piece while it was etching and from using a Sharpie (before I discovered the paint pen) to fix areas that weren’t completely covered with toner. When I went to check on the piece in the middle of the etch, some of the toner and all of the Sharpie ink came off and I didn’t know. So when the etch continued, it etched parts that were supposed to be covered with toner but no longer were! I’ve found that brass and steel are notorious for this problem.
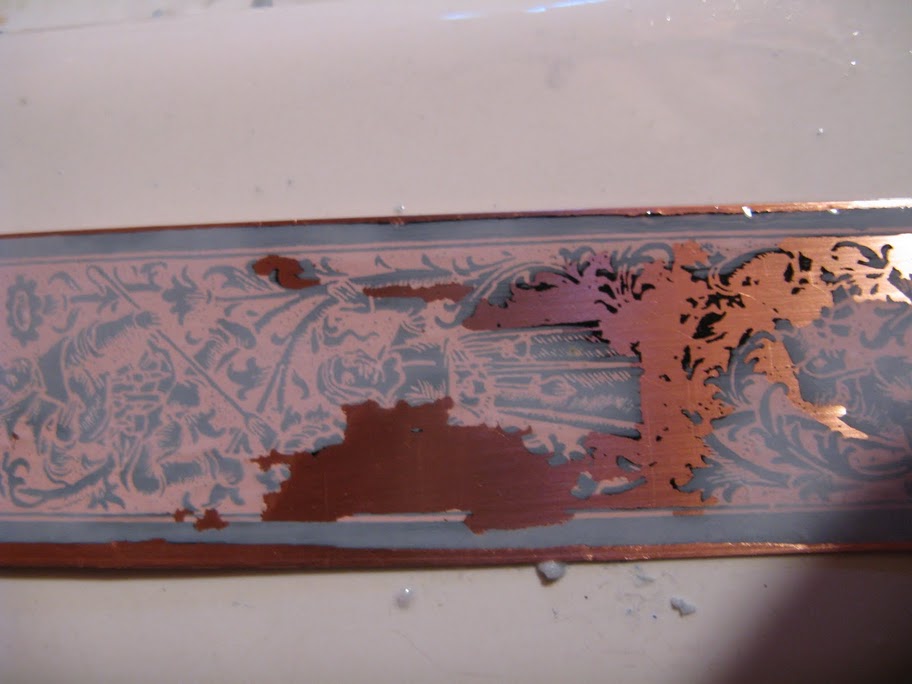
Not enough of a border, the toner doesn’t stick

If your design does not have enough of a border, the toner will not stick. You can see in the left picture how the entire bottom of the words on the bottom of the piece are missing, and how parts of the runes on the bottom right of the right picture are missing. This happened because the design was small and didn’t have a good border, i.e. it was all letters with very little black space around them (maybe 2 pixels at most), not only that but the metal was the same size as the design. If your design has a border without enough black space in it you need to cut your metal larger than the design and trim that off after you etch. In these two cases, the toner didn’t have enough room to stick to something and came off when I was scrubbing the white off. I made a second set of these pieces later on, and even though my design still only had about a 2 pixel black border, I cut the metal about 1/16″ to 1/8″ larger than the design. That time, the toner stayed on and I got a perfect etch as you can somewhat see here in the unfinished/colored pieces:

I probably should have also added some more border around the design (you can see it is somewhat too short in the rightmost picture).
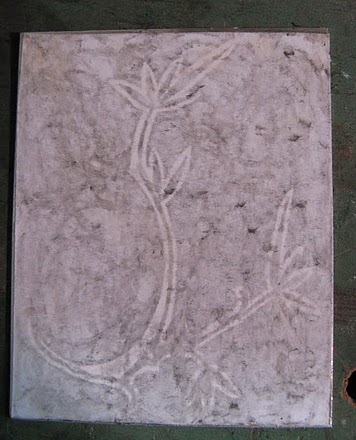
An alternative quick light etch
For copper, brass, nickel silver, and steel, if you don’t need a deep etch and don’t really expect to color your piece, i.e. you just want to mark it in some way, you can get a very light etch by the following procedure:
Take a cloth and soak it in the etching solution. Wring it out but leave it somewhat dripping. Put your piece with the toner on it in a dish and attach the positive (red) lead to it. Put the drenched cloth on top. Turn on your charger and push the negative lead into the cloth. In about a minute you will have a light etch that you can actually feel.
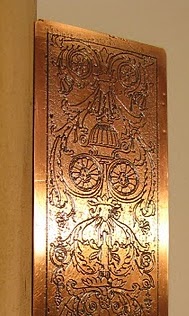
Copper Plating – A nice extra
You can copper plate a piece of steel very simply by taking a brush or cloth, dipping it into the copper sulfate solution and brushing it onto your steel piece. This works because there is a small charge between the steel and the solution and that small charge electroplates the steel with the copper from the solution. It’s basically the reverse of electrolytic etching. Instead of copper getting eaten away, it’s getting deposited.
References
David S. Dowling teaches electrolytic etching in Boston through the School of the MFA, the Stonybrook Fine Arts School, and possibly other art schools.
Thanks to John Flynn for his article on etching silver with phosphoric acid.
If you have any questions, please feel free to contact me and I’ll do what I can to help you. You can reach me via e-mail at etch10@mordent.com.